Battleplan YouTube Gameplay Breakdown and Strategic Guide
Explore the core mechanics of Battleplan shown in YouTube first looks, including drawing tactical plans, managing supply hubs, and unit command structures.
Published: Battleplan Wiki Editorial Team
Table of Contents
What Battleplan YouTube Previews and First Looks Reveal
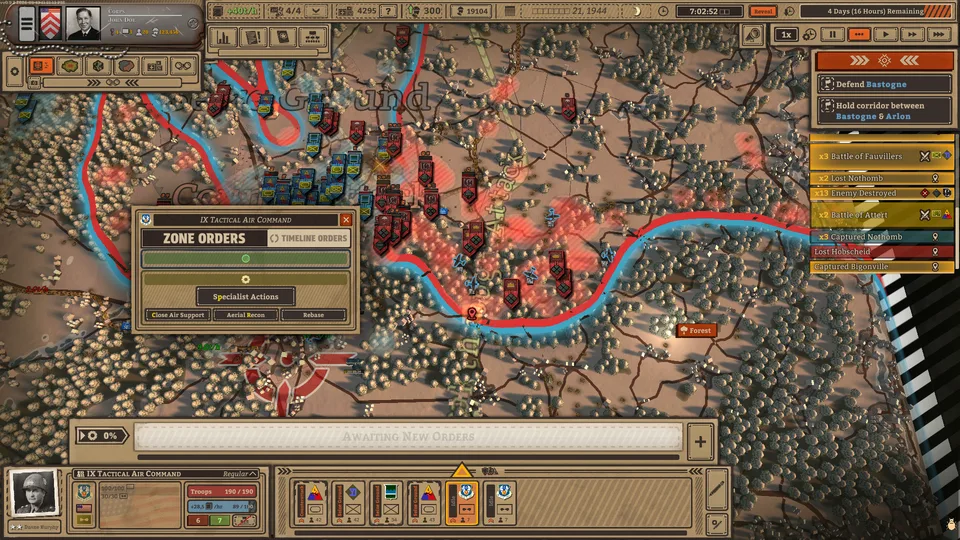
First-look gameplay showcases and creator playthroughs on YouTube have provided strategy enthusiasts with a clear look at how Battleplan on Steam approaches the World War II grand-tactical wargame genre. Developed by Foolish Mortals Games Inc. and published by Slitherine Ltd., the title launched on October 12, 2026. Early gameplay demonstrations highlight that this is not an action-oriented RTS requiring high actions-per-minute. Instead, it places the player in the role of a corps or army-level commander who designs operational battle plans that subordinate officers and companies execute autonomously.
Simulated second by second across massive historical battlefields drawn from real-world elevation and geographic data, early missions demonstrate the sheer depth required to coordinate combined arms offensives. Based on creator walkthroughs covering introductory training operations such as Exercise Tiger and Exercise Fabius in Devon, UK, successful command relies entirely on understanding unit roles, planning multi-stage offensives, and protecting vulnerable logistical lifelines.
Mastering the Map Drawing System and Tactical Orders
The defining mechanic demonstrated in early gameplay footage is the freehand tactical drawing tool. Rather than right-clicking individual units to issue attack commands, commanders select a division, choose an operational doctrine, and draw designated operational zones directly across the map terrain.
YouTube gameplay analysis shows that drawing a single, blanket "Seize Ground" area over an entire objective is one of the quickest ways to stall an assault. When forces are thrown into an undivided zone, supporting elements like engineers and anti-tank guns often blunder into enemy kill zones, while frontline regiments clump together along a single vector. Utilizing the Regimental Plan tool solves this problem by dividing the drawn area into multiple operational sectors.
Assess the Objective and Approach: Identify enemy defensive fortifications, road networks, and elevated terrain. Check reconnaissance reports to spot enemy dugouts and headquarters positions.
Select the Formation: Highlight your infantry or armored division from the bottom command bar to view current manpower, supply consumption, and attached officer traits.
Draft the Regimental Boundary: Hold the left mouse button and drag across the operational corridor. Adjust the shape by right-clicking and dragging the perimeter lines to align with roads or rivers.
Assign Sector Tactics: Click on individual sector headers to switch doctrine. Assign frontline sectors to doctrines like Seize Ground or Breakthrough Attack, while keeping rear sectors on Reserves or Balanced Hold.
Queue Preparatory Specialist Actions: If the objective is fortified or mined, click the "Add Order" option to designate preparatory artillery barrages and engineer mine-clearing paths before executing the ground assault.
Commit the Plan: Click the "Executing" button to authorize division officers to begin troop movements according to your planned timeline.
Unit Roles, Stances, and Combined Arms Synergies
Each formation in Battleplan consists of realistic historical subunits, including infantry companies, scout detachments, engineer teams, artillery batteries, and mobile headquarters. Footage confirms that unit effectiveness is heavily dictated by combined arms adjacency bonuses, meaning unsupported unit types suffer catastrophic attrition against balanced defensive lines.
Standard Infantry
The backbone of any front line. Infantry are relatively cheap to field and excel in defensive operations, automatically digging foxholes and dugouts when idle. They travel by truck on friendly supply roads but dismount when approaching hostile territory, advancing on foot at realistic speeds (roughly 5 km/h).
Field Artillery Batteries
Artillery delivers devastating long-range bombardments capable of applying massive firepower penalties and morale debuffs to fortified defenders. However, they consume immense amounts of ammunition and are virtually helpless if caught in close-quarters combat.
Armored & Mechanized Divisions
Armored forces provide exceptional breakthrough speed and heavy direct firepower. Conversely, tanks drain supply rapidly, gain minimal defensive cover from field fortifications, and struggle when navigating dense urban terrain or muddy swamps without engineer support.
Combat Engineers
Specialized support units tasked with clearing lethal minefields and neutralizing fortified strongpoints. When defending, engineers construct improved field fortifications and lay minefields capable of halting enemy thrusts.
Reconnaissance Scouts
Operating ahead of primary columns, scouts automatically probe forward to reveal enemy unit compositions and tag defensive layouts. They grant speed bonuses to adjacent allied units and will skirmish and retreat if pressured.
Anti-Tank (AT) & Headquarters
Anti-tank units counter enemy armor while stripping fortification bonuses. Headquarters companies generate command auras and house officers; if an HQ takes fire, officers can be wounded or killed, causing temporary command paralysis across the formation.
Customizing the Chain of Command and Officer Traits
A critical layer of operational depth showcased in early playthroughs is the dynamic order of battle. Players are not restricted to rigid default formations. You can merge an independent armored division into an infantry division by dragging their unit cards together, creating a unified Corps structure that responds to collective operational orders.
Conversely, formations can be split down to regiment and company levels whenever operations require capturing diverging secondary objectives. By clicking and dragging the command hierarchy lines between unit portraits, players can sever command relationships or establish new operational attachments on the fly.
Command efficacy is further modified by assigned officers. Officers possess distinct personality traits and tactical specializations that level up as they survive major engagements. For example, an officer with the "Bite and Hold" trait grants infantry under their command a 10% bonus to defense and a 10% bonus to damage, at the cost of a 10% reduction in tactical movement speed. Protecting the officer’s headquarters unit is vital; losing an experienced officer paralyzes subordinate companies and resets valuable accumulated command perks.
Logistics Simulation: Supply Hubs, Depots, and Encirclements
As shown extensively in Exercise Fabius walkthroughs, battles in Battleplan are won through logistics rather than raw numerical superiority. Units carry internal supply reserves represented by a blue status bar. When units move away from established supply corridors, their status shifts from a green surplus to a red deficit.
+-------------------------------------------------------------+
|                     LOGISTICAL SUPPLY FLOW                  |
|                                                             |
| [ Off-Map Hub ] ===(Road)===> [ Supply Depot ] ---> Units   |
|   (Primary Flow)               (Local Distribution)         |
+-------------------------------------------------------------+
                                       |
                     Enemy cuts road corridor:
                                       v
                          [ Supply Starvation ]
                                       |
                +----------------------+----------------------+
                |                                             |
                v                                             v
     -275 Combat Firepower Debuff                    Morale Depletes to Zero
     Units Suffer Attrition                          Mass Surrender Follows
Off-map Supply Hubs pipe bulk supplies into the theater, which are then stored and distributed by forward Supply Depots. Units fighting on depleted supplies suffer heavy combat penalties, move slower, and eventually suffer attrition damage as wounded troops succumb and soldiers desert.
Warning
Resupply Vulnerability: Sending an exhausted formation back to a supply depot for replenishment requires patience. While replenishing, units cannot effectively return fire and will suffer catastrophic losses if struck by an enemy counteroffensive. Always screen resupplying units with fresh reserve regiments.
Cutting off an enemy pocket from its supply hub is far more effective than launching costly frontal assaults against entrenched positions. Once an operational plan successfully encircles an enemy territory—turning the tactical map contour completely blue around the pocket—the trapped division suffers immediate operational penalties (such as a -275 firepower modifier). With their logistics severed, repeating supply checks triggers cascading morale failure, forcing entrenched elite defenders to wave the white flag without requiring massive artillery bombardment.
Tactical Stances and Specialist Doctrine Reference
When designing operational sectors within a Regimental Plan, matching the tactical doctrine to unit capabilities and objectives determines the outcome of the engagement.
Tactical Stance
Operational Purpose
Unit Behavior & Strengths
Recommended Conditions
Balanced Hold
Sector Defense
Holds designated ground firmly while launching localized counterattacks against overextended attackers.
Standard front-line defensive screening and securing supply corridors.
Cautious Hold
Passive Defense
Minimizes friendly casualties by keeping units deeply entrenched; avoids counter-attacking outside defensive lines.
Defending against superior armored breakthroughs or heavily fortified positions.
Defense in Depth
Staggered Defense
Organizes regiments in successive defensive echelons to absorb momentum and prevent sudden breakthroughs.
Holding open plains or wide sectors against aggressive enemy advances.
Seize Ground
Territory Capture
Drives units forward to secure physical map points; units advance steadily across the designated sector.
Moving forward to secure unoccupied crossroads or push back retreating remnants.
Breakthrough
Shock Offensive
Concentrates aggressive offensive power along a narrow path to shatter defensive lines.
Employing armor and heavy infantry against softened defensive perimeters.
Encircle
Logistical Cutoff
Directs outer flanking columns around enemy lines to link up and sever supply corridors.
Neutralizing heavily fortified urban centers like Exeter or Newton Abbot without frontal assaults.
Reserves
Operational Support
Stays in the rear sector of the plan; automatically maneuvers to reinforce sectors under heavy assault.
Placed behind frontline sectors to back up primary assault regiments.
Environmental Cycles: Night Operations, Pacing, and Air Support
Unlike standard RTS titles that maintain uniform pacing, Battleplan simulates the passage of time realistically. Battles can span from one week to an entire month of continuous second-by-second tactical simulation.
Gameplay footage highlights the drastic shift that occurs when night falls. Under the cover of darkness, tactical visibility plummets and radio silence protocols take effect. Ground units will not advance into uncharted hostile territory during night hours due to the risk of ambush. Instead, units automatically stop to rest, restore operational cohesion, and dig defensive foxholes. Players can use super-fast-forward time controls (up to 480x speed) during these calm night phases, transitioning back to standard real-time when dawn arrives and the engagement resumes.
As campaigns progress into major operations like the Battle of Cherbourg or the Defense of Caen, players gain access to high-tier off-map air assets:
Aerial Reconnaissance: Reveals entrenched enemy positions and active supply hubs deep behind front lines.
Fighter-Bombers: Harass moving armored columns and disrupt supply convoys traveling along primary roads.
Heavy Bombers: Conduct massive pre-assault preparatory bombardments against hardened concrete bunkers and urban centers before ground divisions move in.
Operational Readiness and Attack Preparation
Launching an assault before verifying supply reserves and specialist support almost always leads to broken units and failed offensives. Community gameplay reports emphasize conducting a systematic operational review before committing troops to combat.
[ ] Logistics Connection Verified: Confirm forward supply depots are connected via undamaged roads to primary supply hubs, and that the division's blue supply indicator is positive.
[ ] Reconnaissance Completed: Deploy scout companies or air reconnaissance to reveal enemy defensive boundaries, machine-gun strongpoints, and headquarters locations.
[ ] Preparatory Fire Queued: Ensure artillery batteries have stockpiled adequate ammunition and are assigned specialist barrage orders to suppress fortifications before infantry advance.
[ ] Minefield Removal Planned: Attach combat engineers to lead assault vectors if enemy territory contains defensive minefields.
[ ] Sectors and Reserves Assigned: Verify that the Regimental Plan is partitioned into distinct attack zones with at least one rear sector designated as Reserves.
[ ] Execution Timing Set: Avoid issuing aggressive breakthrough orders just before sunset; allow troops to dig in overnight and commence attacks at daybreak.
Frequently Asked Questions
What planning modes exist in Battleplan?
Community gameplay walkthroughs note that Battleplan features two command pacing styles. In the daily planning mode, commanders issue comprehensive operational directives once per 24-hour cycle, reserving an "Emergency Meeting" action if plans go wrong. Alternatively, continuous planning allows ongoing dynamic orders, though changes incur a preparation delay before units execute without penalties.
Can you manually command individual companies?
Yes. While the primary gameplay loop revolves around drawing high-level regimental and divisional operational zones, players can zoom in to individual companies, right-click, and issue manual movement orders. This micro-adjustment is useful for closing accidental gaps in an encirclement ring or pulling a damaged unit out of direct combat.
How do you crack heavily fortified urban objectives?
Frontal assaults against urban strongpoints like Newton Abbot or Exeter lead to massive casualties. The recommended tactic shown in gameplay guides is to use specialist orders to lay down extended artillery bombardments, deploy combat engineers to dismantle minefields, and draw wide encirclement wings to sever the town's road connection to its supply depot. Once starved of ammunition, the defenders' combat efficiency collapses.
What happens if an operational headquarters is destroyed?
If an HQ company is overrun or destroyed by artillery fire, the assigned commanding officer has a high probability of being wounded or permanently killed. This immediately inflicts command paralysis on all subordinate regiments, freezing their orders, stripping officer trait bonuses, and lowering formation morale until command hierarchy is re-established.