Battleplan Map and Strategy Guide: Mastering Orders and Logistics
Learn how to master the Battleplan map, coordinate multi-stage offensives, manage supply lines, and execute complex maneuvers in this deep WWII RTS.
Published: Battleplan Wiki Editorial Team
Table of Contents
Mastering the Battleplan Map Interface
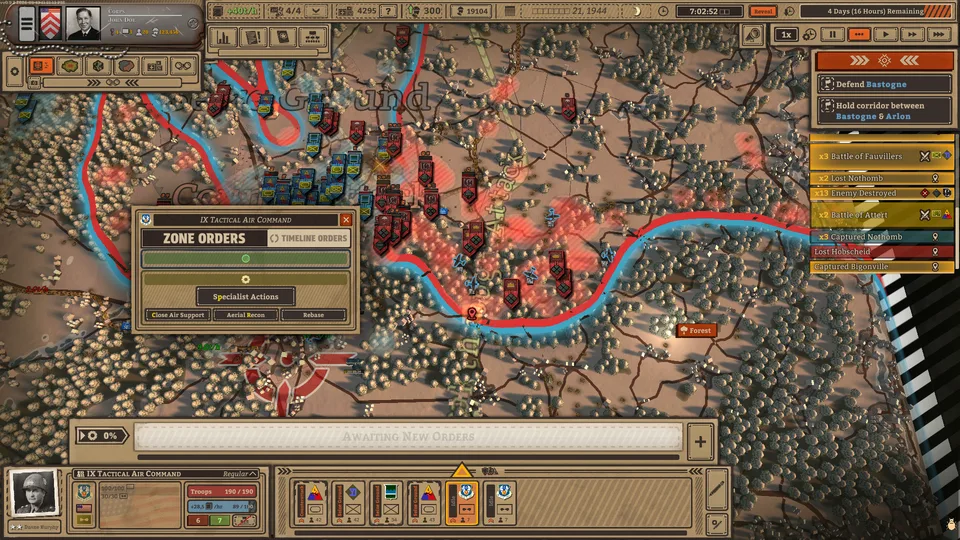
In Battleplan, the map is not merely a background for the action; it is your primary control interface. Unlike traditional RTS titles where you issue point-and-click commands to individual units, this game requires you to conceptualize, draw, and refine operational plans directly onto the terrain. Because the game utilizes real-world geographic data, your tactical decisions—such as placing artillery on high ground—are heavily influenced by the actual topography of the battlefield.
The map interface allows you to view supply lines, unit positions, and historical data. To succeed, you must move beyond simple unit movement and start thinking in terms of "zones of operation."
Tip
Enable 3D Unit Icons: According to player feedback and gameplay guides, it is highly recommended to keep the "3D icons for units" setting enabled in the options. While the UI displays unit icons at the bottom, learning to recognize them can be difficult. The 3D icons provide a clearer visual representation of your formations on the map, especially when zoomed in.
The Planning Phase: Readiness and Execution
The core gameplay loop revolves around the planning phase. At the start of a new playthrough, you are often presented with choices regarding how you want to handle order execution.
Understanding Readiness Mode
One of the most significant settings is "Readiness Mode." When enabled, this mode adds a layer of depth and difficulty to the game. You are limited to planning orders during specific phases of the day, or, if you create plans during the entire day, you must wait for them to reach 100% readiness to execute them without penalties.
Warning
If you execute orders before they reach 100% readiness in this mode, your units will suffer performance penalties. Always plan your next move while your current one is being executed to minimize downtime.
Drawing Orders
Drawing orders is intuitive, but mastering the logic behind them is what separates novice commanders from veterans.
Color Coding: The game uses a color-coding system to help you track orders. Blue lines typically represent defensive orders, red lines indicate offensive maneuvers, and gray lines are reserved for specialist tasks.
Zone Orders: You can designate areas of operation for your units and transfer troops between zones by dragging and dropping. This system is largely automatic when using the "Regimental plan order."
Manual Control: Even with automation, manual planning is often superior. You can drag and pull the borders of your drawn zones using the right mouse button to fine-tune your frontline, ensuring your units are exactly where you need them to be.
Logistics: The Lifeline of Your Army
The adage "an army marches on its stomach" is a core mechanic in Battleplan. If your units run out of supplies, their morale will plummet, and their combat effectiveness will be severely degraded.
Managing Supply Points
You only have a limited number of supply points (often around four for large maps). These points must be strategically placed to fuel your advance.
Monitor Supply: Open the Supply Overview (second icon from the right at the top of the screen).
Assess Needs: Identify where your armored or infantry divisions are pushing. If they are moving deep into enemy territory, your current supply points will soon be out of range.
Deconstruct: Left-click the supply hub you wish to move, then click the trash bin icon.
Wait: Be aware that deconstructing and reconstructing supply points takes real-time minutes. Do not wait until your tanks are at 0% fuel to move your supply infrastructure.
Reconstruct: Place the supply point in a new location that covers your advancing forces.
The Importance of Re-basing
If you are using air support, remember to rebase your aircraft squadrons. If you move your supply points forward to support your ground troops but leave your air support behind, they will run out of supplies and become ineffective. Always check the status of your air squadrons (look for flashing yellow text, which indicates supply issues).
Tactical Gameplay and Unit Synergy
Success in Battleplan requires a "combined arms" approach. You cannot rely on a single unit type to win the war.
The Power of Scouting
Scouting is not just for intelligence; it is a tactical weapon. When you use aerial recon or scout units to uncover enemy positions, those enemies become "marked."
Marked Units: A marked unit displays a binoculars icon. This status actively decreases the enemy's morale and defenses, making them significantly easier to defeat.
Supply Interdiction: Scouting also reveals enemy supply points. If you can locate these, you can plan your offensives to capture them, effectively starving the enemy and forcing them to surrender.
Morale and Fortification
Units that stay in one position for extended periods will build up their fortification level, which is shown as a percentage.
Breaking Fortifications: Use artillery barrages to reduce enemy fortification levels before launching an infantry or tank assault.
Morale Management: Combat is a drain on morale. If you pin enemy units in place using defensive orders (like a counterattack order used defensively), you can drain their supplies and morale without necessarily needing to engage in a full-scale assault immediately.
Executing the Breakthrough
The ultimate goal in many scenarios is to break through the enemy line, fold their flanks, and capture key objectives. This requires a multi-stage approach.
The "Armored Fist" Strategy
When you have a tank division, they act as your spearhead. However, a common mistake is sending tanks alone.
Prepare the Front: Use infantry divisions on "Seize Ground" orders to pin the enemy and clear the path.
Artillery Support: Soften up the target area with artillery barrages.
The Breakthrough: Direct your armored division to execute a "Breakthrough" order through the weakened point.
Consolidation: As the tanks punch through, they will move in a relatively straight line. You must have infantry divisions following closely behind with "Seize Ground" orders to mop up the remaining pockets of resistance and secure the territory.
Tip
If you leave pockets of enemies behind your lines, they will slow down your progress and potentially cut off your supply routes. Always ensure your infantry is cleaning up the area behind your advancing armored spearhead.
Handling Night and Time
Remember that the game simulates time. During the night, units generally do not make significant progress in combat, but they can move within friendly territory. Keep an eye on the mission time counter at the top right of the UI. If you are waiting for reinforcements, ensure your current plans are set to hold ground or perform defensive maneuvers to conserve strength until your reinforcements arrive.
Frequently Asked Questions
Why are my orders taking so long to execute?
If you are playing in "Readiness Mode," orders require time to reach 100% readiness. If you execute them prematurely, you incur penalties. Ensure you are planning your next moves well in advance of your current engagements.
How do I know if my units are out of supply?
Check the Supply Overview map mode. If your units are far from a supply point, or if you have recently moved/deconstructed a supply hub, your units will show status warnings. Watch for flashing yellow text on unit icons, which indicates supply shortages.
Can I automate the entire army?
While the game features "Zone Orders" which can be largely automatic, the game is designed for you to provide high-level, deliberate orders. The most effective commanders combine automated zone orders for routine tasks with manual, precise orders for major offensives and breakthroughs.
Why should I bother with "Historical Units" options?
If you want to jump straight into the action, the "Use Historical Units" option allows you to bypass the detailed army, unit, and officer management screens. It is a great way to start if you are less interested in the simulation aspect of the chain of command and more interested in the tactical map gameplay.