Battleplan Guide: Mastering High-Level WW2 Strategy and Logistics
Master the complexities of Battleplan. Learn essential tips for managing supply lines, commanding divisions, and executing successful tactical operations in this WW2 RTS.
Published: Battleplan Wiki Editorial Team
Table of Contents
Understanding the Battleplan Philosophy
Battleplan, released on October 12, 2026, represents a distinct shift in the World War II real-time strategy genre. Unlike traditional RTS titles where you might click individual units to move them across a field, this game emphasizes high-level command. You are the general, not the platoon leader. Your role is to define the strategy, manage the logistics, and set the objectives, while your officers and units execute those orders with a degree of autonomy.
The game simulates massive battles second-by-second over extended periods. Because the simulation is deep—focusing on real-world geography, supply chain integrity, and unit hierarchy—it requires a different mindset. If you jump in expecting to "zerg rush" the enemy, you will likely find your forces stalled by poor supply lines or decimated by entrenched defenses.
The Art of Drawing Battle Plans
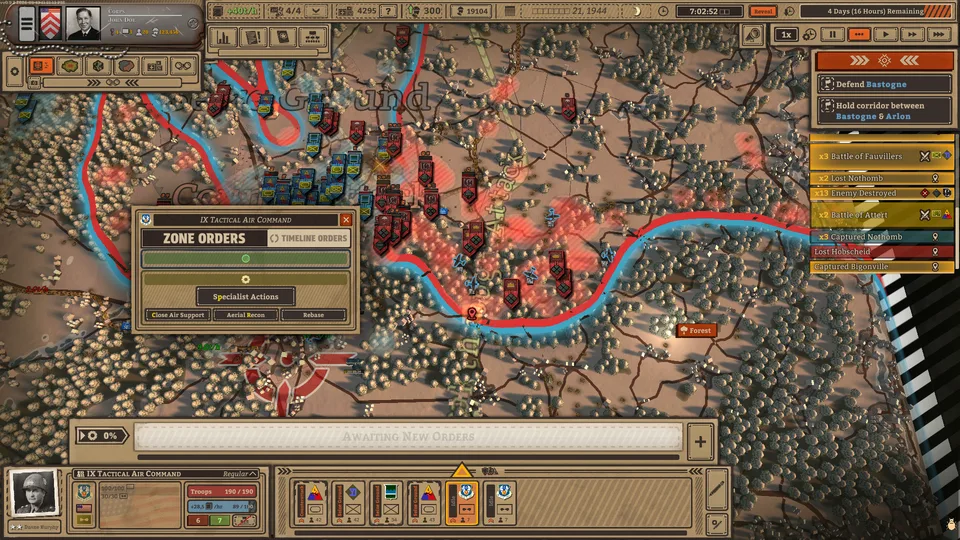
The most unique feature of Battleplan is its planning interface. You do not simply point and click; you draw. By holding the left mouse button, you define areas of operation, regimental plans, and movement paths directly onto the map.
How the Planning System Works
The game allows you to create elaborate, multi-step offensives. When you draw an area, you assign a tactic—such as "Seize Ground," "Breakthrough," or "Balanced Hold." The AI then manages the movement of the regiments within those zones.
[!STEPS]
Define the Area: Select your unit and draw the operational zone on the map.
Select Tactics: Choose the appropriate stance for the zone (e.g., "Balanced Hold" for defense, "Seize Ground" for offense).
Refine with Adjustments: Use right-click and drag to adjust the shape of your zones if the situation changes.
Execute: Once the plan is drawn, your units begin the operation.
Chain Orders: You can add subsequent orders to an executing plan, such as "Artillery Barrage" or "Lay Minefield," to create a cohesive multi-stage attack.
[!TIP]
Avoid drawing one massive zone for your entire army. Splitting your forces into smaller, distinct zones allows for more granular control. If you draw one giant zone, your units may clump together, making them inefficient and vulnerable to being flanked or surrounded.
Mastering Logistics and Supply Lines
In Battleplan, supply is the lifeblood of your army. You can have the most experienced division in the world, but if they are cut off from a supply depot, they will quickly lose morale, stop fighting effectively, and eventually surrender.
The Supply View
Always keep an eye on the supply view. When you select a unit, look for the supply bar in the interface. Green indicates the unit is receiving adequate supplies; red indicates it is consuming more than it receives.
Supply Hubs vs. Depots: Supply hubs bring resources from off-map, while depots transfer that supply to nearby units. If your advance moves too far from your depots, your supply lines will stretch, and your units will suffer penalties.
Capturing Logistics: One of the most effective ways to break an enemy is to cut their supply lines. If you surround an enemy division, they are essentially doomed. They will lose morale, take attrition damage, and eventually run out of the ability to fight.
Managing Your Chain of Command
Your army is structured into a hierarchy of headquarters, regiments, battalions, and companies. Understanding this structure is essential for success, especially when you need to reinforce a failing front.
Officer Traits and Veterancy
Each division is led by an officer. These officers are not just cosmetic; they possess specific traits that can turn the tide of battle. For instance, some officers provide defensive bonuses ("Reliable," "Bite and Hold"), while others might boost damage output.
Protect Your Officers: If a headquarters unit takes too many casualties, there is a risk the officer will be killed or wounded, which can temporarily paralyze the entire group.
Merge and Split: You can merge units into a corps to make commanding them easier, or split them down to the company level for specific tasks. This flexibility is vital when you need to detach a specific unit—like engineers—to clear a minefield while the rest of your force pushes forward.
[!CARDS]
Essential Unit Roles
Infantry
The backbone of your army. They are excellent at holding ground and defending, but they struggle on the offense without support. They automatically dig fortifications when idle.
Engineers
Crucial for breakthrough operations. They can lay minefields to protect your flanks and clear enemy minefields, allowing your armor to push through safely.
Artillery
Provides fire support over long distances. They are vital for softening up fortified positions before an infantry or armored assault. However, they are vulnerable in close quarters.
Scouts
Automatically move to reveal enemy positions. They provide extra movement speed to nearby units and are essential for maintaining intel on the enemy's location and orders.
Strategic Tips for Success
Based on gameplay observations and tutorial scenarios like Exercise Tiger and Exercise Fabius, here are some tactical approaches to keep in mind.
1. Don't Attack Head-On
If an enemy has established fortifications (often indicated by a percentage in the UI), a direct attack is usually a recipe for disaster. Instead, use your artillery to bombard them, or better yet, maneuver around them to cut off their supply lines. Forcing them to abandon their fortified position is often more efficient than trying to destroy it.
2. Use "Emergency Meetings" Wisely
The game gives you the ability to plan once a day, but it also provides an "emergency meeting" option. Save this for when a plan goes wrong or the enemy makes an unexpected move. Do not waste it on minor adjustments.
3. Nighttime Operations
Visibility is reduced at night, and units generally stop to rest. Use this time to reposition your forces, set up new supply depots, or dig in. Trying to push a major offensive at night is rarely effective unless you have a specific tactical advantage.
4. Understand Terrain
Terrain dictates movement and combat efficiency. Infantry perform well in forests and cities but are extremely vulnerable in swamps and on beaches. Always check the terrain before ordering a movement.
[!WARNING]
Be careful when moving your headquarters. If you move an HQ, it moves the entire regiment attached to it. If you move it too far or into a dangerous zone, you risk losing the officer and the bonuses they provide to the entire formation.
Frequently Asked Questions
[!FAQ]
Is Battleplan like Hearts of Iron?
While both are strategy games set in WW2, Battleplan is distinct. It focuses more on the tactical execution of specific, massive month-long battles rather than global grand strategy. The "drawing" mechanic creates a unique, more hands-on tactical experience than the spreadsheet-heavy management of grand strategy games.
Why are my units retreating?
Units retreat when their morale hits zero. This happens if they take heavy casualties, are surrounded, or are low on supplies. If a unit is retreating, it is effectively useless until it reaches a safe zone and recovers.
How do I win when the enemy is dug in?
You need to combine arms. Use scouts to find the enemy, artillery to soften their fortifications, and engineers to clear mines. If that isn't enough, stop the frontal assault and look for an encirclement opportunity to starve them out.
What happens if I run out of supply?
Your units will suffer attrition, meaning they will lose men over time without even being in combat. They will also fight with significant penalties, making them easy targets for the enemy. Always prioritize building supply depots as you advance.