Battleplan Strategy Guide: Mastering Planning, Logistics and Combat
Discover essential battleplan strategy tips for Foolish Mortals Games' WWII RTS. Master map orders, supply lines, and division management to win.
Published: Battleplan Wiki Editorial Team
Table of Contents
Getting Started with Battleplan Strategy Basics
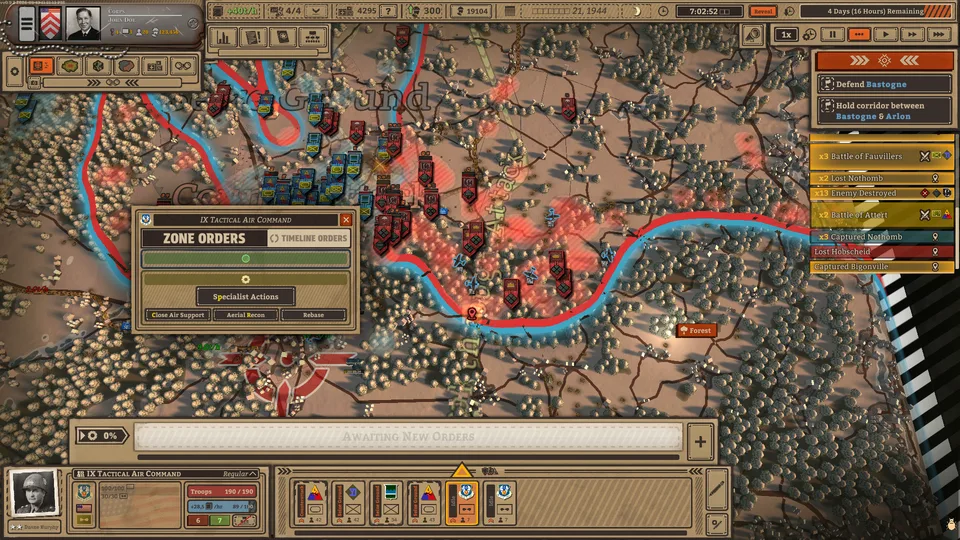
When diving into Foolish Mortals Games' historical real-time strategy title, understanding how to balance high-level planning with autonomous execution is critical. Unlike traditional fast-paced RTS games, this title simulates month-long operations where divisions carry out your drawn-out instructions second by second. Success depends entirely on how well you prepare your initial phase, configure your readiness options, and establish a reliable supply network before launching your spearheads.
To begin your campaign effectively, players must choose their gameplay preferences at the start of a playthrough. According to community reports and gameplay guides, enabling the "Readiness mode for planning" offers a more forgiving system than the strict single-phase planning mode. While readiness mode requires you to wait for plans to reach 100% readiness to execute them without penalties, it grants the flexibility to create new orders throughout the entire day. Pairing this with the zone orders system allows you to designate operational areas and easily transfer troops across zones.
Configure Readiness Mode: Select the readiness planning option at the start of your playthrough to allow continuous order creation while managing readiness percentages.
Examine Supply Overviews: Open the supply overview at the top right of the UI to locate your initial supply points before moving your army deeper into enemy territory.
Establish Historical Units: Choose the historical units option if you want to skip manual army and officer management and jump straight into tactical execution.
Managing Logistics and Supply Lines
An army marches on its stomach, and in this simulation, fuel and ammunition dictate whether your offensive succeeds or stalls. Big maps and missions typically provide only four supply points. Players must strategically place, delete, and reconstruct these hubs as their forces advance.
Tanks and armored divisions consume vast amounts of supplies when executing breakthroughs. If your units outpace your logistics network, they will rapidly lose morale and combat effectiveness.
Warning
Deconstructing and reconstructing supply points takes several minutes of real-time during gameplay. Always maintain multiple operational supply points near the front, and remember to rebase air squadrons when moving their supporting infrastructure, or your aircraft will run out of fuel and operational efficiency.
Check the supply overview regularly to ensure your armored fist and infantry divisions remain supplied.
Relocate supply hubs progressively as you capture enemy territory to use towns as logistical springboards.
Monitor air squadron status indicators for warning letters signaling low supply states.
Executing Multi-Stage Offensives and Combat Orders
Mastering the art of drawing orders directly onto the map forms the core of your tactical success. Orders are color-coded: blue for defensive actions, red for offensive maneuvers, and gray for specialist tasks. To achieve a successful breakthrough, you must coordinate multiple division types simultaneously.
Community insights emphasize the importance of pinning enemy forces in place before launching an armored spearhead. For instance, assigning counterattack or seize ground orders to infantry divisions on the flanks keeps enemy units busy, draining their morale and preventing them from reinforcing their center. Once the enemy line is softened up by preparatory artillery barrages and scout aircraft, your tanks can punch through the defenses.
Reconnaissance & Support
Air scout squadrons reveal enemy positions, mark targets to reduce their defenses, spot enemy supply points, and improve the accuracy of artillery barrages.
Armored Breakthroughs
Heavy armored divisions move rapidly through friendly and enemy territory. Use them to punch deep into the enemy rear while infantry divisions follow closely to mop up remaining pockets of resistance.
Customizing Divisions and Officer Management
Beneath the grand strategy layer lies a detailed army builder. Players can customize formations down to individual unit patches and names, hire and level up officers, and assign specific traits that combine with custom or historical army compositions. Keeping your officers alive increases their veterancy and grants useful quirks, though you must also heed—or ignore—their tactical advice during missions.
For players who prefer immediate action without deep micro-management, utilizing historical units lets you bypass the army builder entirely while still enjoying the deep simulation mechanics. Whether you choose to customize every battalion or stick to historical formations, understanding unit stats like morale, fortification levels, and supply status by zooming in on the 3D models will keep you one step ahead of the opposition.