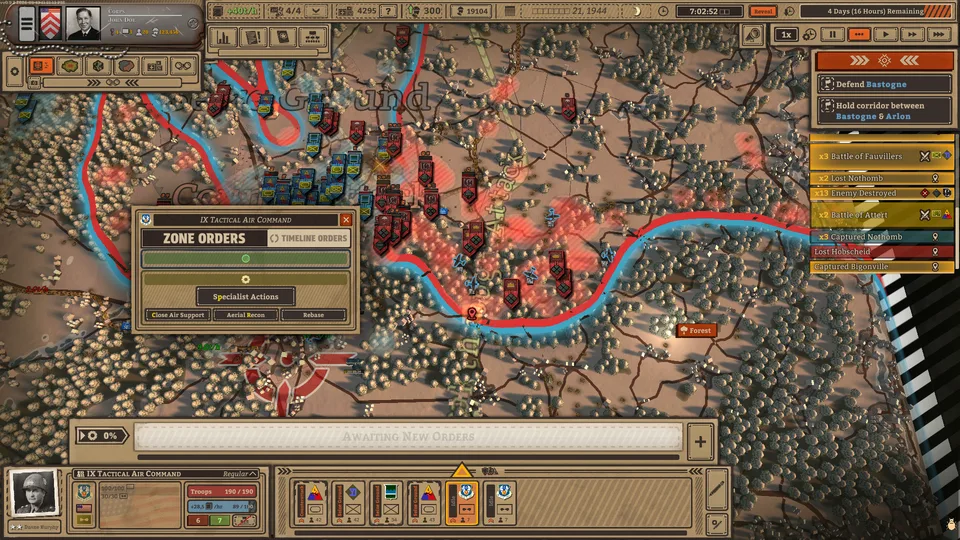
Learn how to master Battleplan drawing orders, manage supply lines, and execute multi-step real-time strategy maneuvers in Foolish Mortals Games' WWII RTS.
Published: Battleplan Wiki Editorial Team
Table of Contents
Introduction to Tactical Planning in Battleplan
Assess the Map: Switch to the supply overview and strategic overlays at the top left to locate supply points and enemy positions before taking action.
Configure Readiness: Enable Readiness mode for planning to allow order creation throughout the day, keeping in mind the need to wait for 100% readiness to avoid execution penalties.
Draw Orders: Use the map drawing interface to designate zones, set defense or counterattack orders for infantry, and chart breakthrough paths for armored divisions.
Execute and Adapt: Run your prepared orders while continuously planning the next two steps ahead to maintain momentum and avoid supply bottlenecks.
When diving into Battleplan by Foolish Mortals Games Inc. and Slitherine, standard real-time strategy reflexes take a back seat. Instead of micro-managing every single soldier, you act as a high-level commander who designs elaborate, multi-step operations by drawing directly on a massive, geographically accurate Western Europe map.
Mastering the interface requires understanding how army formations interpret your drawn lines, how to balance offensive pushes with defensive holds, and why logistics can make or break an entire campaign. This guide breaks down the core mechanics of drawing orders, setting up effective chains of command, and maintaining operational readiness during intense month-long WWII engagements.
Understanding Order Types and Color Coding
The foundational element of map manipulation in Battleplan revolves around drawing intuitive shapes and boundaries across regions modeled from real-world geographic data. According to community reports and developer insights, orders are categorized into distinct functional color codes to help you track complex multi-division maneuvers at a glance:
Blue Orders: Primarily represent defensive postures, such as holding a line or setting up defensive depth.
Red Orders: Denote aggressive, offensive actions like breakthroughs, seize ground commands, and direct assaults.
Gray Orders: Cover specialist tasks, including engineering support, mining, or clearing obstacles.
While individual orders carry these functional hues, every army formation is assigned a unique personal color on the map to display its currently assigned paths. At first, managing overlapping colors across multiple adjacent units can feel overwhelming. However, community feedback highlights that once you adapt to this visual shorthand, it becomes much easier to determine which corps or division is executing a specific order on a crowded frontline.
You can also manually fine-tune your operational zones. Grabbing and pulling the boundaries with the right mouse button allows you to reshape a designated sector, while left-clicking and dragging lets you shift the entire zone's position to accommodate changing battlefield conditions.
Setting Up Readiness and Pre-Planning
A common pitfall for newcomers is attempting to react to the enemy reactively without adequate preparation. Because missions simulate massive historical battles second-by-second over weeks or months, proper preparation dictates victory.
At the start of each playthrough, players can toggle the Readiness mode for planning. While the standard planning phase restricts your order creation to a single daily window, Readiness mode allows you to formulate new plans throughout the entire day. The trade-off is efficiency: if you execute orders before they reach 100% readiness, your units suffer performance penalties.
Tip
Always stay two steps ahead. As your armored spearhead nears the end of its current breakthrough order, you must already have the subsequent seize ground or counterattack orders drawn and processing in the background. Pausing the game using the time controls at the top right of the UI gives you the breathing room required to adjust plans as previous ones succeed or fail.
Combining Infantry, Armor, and Air Support
Effective strategy demands combined-arms coordination. Relying solely on tanks will leave your flanks exposed and your supply lines overextended.
Infantry and Defensive Pinning
When facing heavily fortified enemy positions, direct infantry assaults are notoriously slow and will severely degrade combat effectiveness. Instead, community strategy guides suggest placing defensive or counterattack orders along sections of the contact line. While counterattacking might sound counterintuitive when you want to advance, it immediately pins enemy units in place, draining their morale and supplies. This keeps them occupied and prevents them from mounting a rapid defense against your primary armored thrust elsewhere on the map.
Armored Breakthroughs
Once the enemy front is softened via artillery barrages—which reduce enemy fortification levels shown as percentages in the unit status box—you can unleash your armored divisions. Tanks move exceptionally fast through friendly territory and punch through enemy lines with devastating force. However, because they move in relatively straight, rapid lines, infantry divisions must follow closely behind with Seize Ground orders to mop up remaining pockets of resistance on either side of the breakthrough corridor.
Aviation and Scouting Assets
Air assets add a vital layer of intelligence and fire support:
Air Recon Squadrons: Scouting isn't just about visibility; uncovered enemies receive a binoculars marker that decreases their morale and defense while boosting incoming artillery accuracy and damage. Recon also reveals enemy supply hubs.
Close Air Support: Attack aircraft can be directed to follow your tank spearheads, neutralizing resistance and triggering enemy retreats (indicated by white flags when morale hits rock bottom).
Managing Logistics and Supply Depots
As the old military adage goes, an army marches on its stomach—and in Battleplan, ignoring logistics will stall even the most brilliant offensive.
On large maps, you are typically allocated a limited number of supply points (often around four active hubs). As your armored spearhead cuts deep into enemy territory, your units will rapidly outpace their supply lines. When this happens:
Select a supply hub and click the trash bin icon to deconstruct it and free up a supply slot.
Relocate the hub closer to the front lines, keeping in mind that deconstruction and reconstruction take several real-time minutes.
Ensure air squadrons and specialized units are properly rebased to active nearby supply points. Neglecting this causes units to run out of supplies, flashing yellow on the UI and rendering their combat operations drastically ineffective.
By balancing meticulous supply logistics with deliberate, drawn-out map orders, you can systematically fold enemy lines, cut off their supply hubs, and achieve decisive victory across the historic battlefields of Western Europe.