Battleplan Executing Orders: A Strategic Guide to Command and Logistics
Master the art of planning and executing orders in Battleplan. Learn how to manage supplies, coordinate multi-stage offensives, and optimize your army's efficiency.
Published: Battleplan Wiki Editorial Team
Table of Contents
Mastering the Planning Phase and Readiness Mode
At the heart of Battleplan lies the tension between meticulous preparation and the fluidity of the battlefield. When starting a new playthrough, you are presented with a critical choice: the standard Planning phase or the Readiness mode. While the standard mode restricts you to one planning phase per day, Readiness mode allows you to issue orders throughout the day. However, this flexibility comes with a trade-off: orders must reach 100% readiness to be executed without penalties.
Tip
Always ensure your orders are prepared well in advance. In Readiness mode, if you execute an order before it hits 100%, your troops will suffer, potentially stalling your momentum.
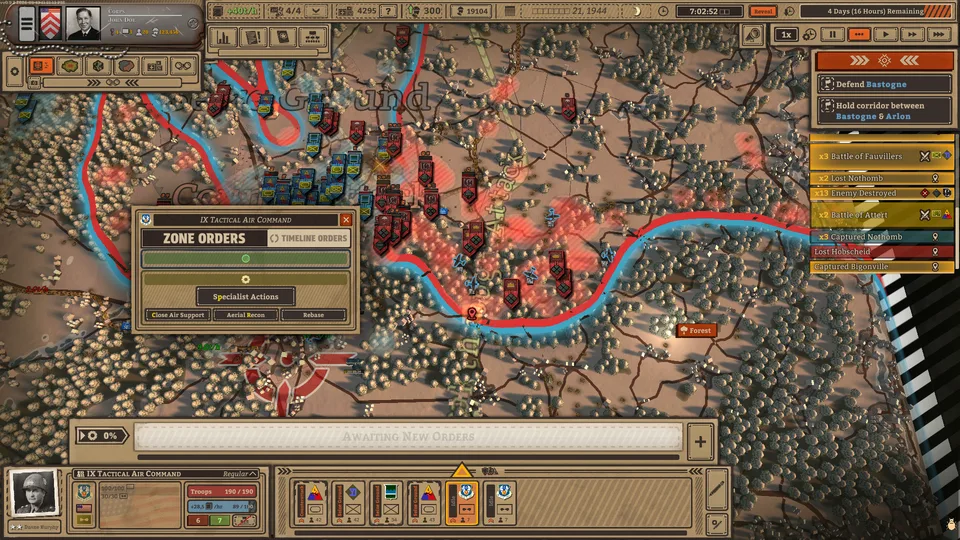
The key to success is the "Zone Orders" system. By designating operational areas and using the Regimental plan order, you can automate unit movement. However, for maximum control—especially during difficult offensives—manual planning remains the superior choice. This allows you to draw specific paths and objectives tailored to the terrain.
Strategic Logistics: Managing Supply Points
An army marches on its stomach, and in Battleplan, this is reflected in the critical importance of supply points. Even on massive maps, you are often limited to a small number of active supply points.
Warning
Moving a supply point is not an instant action. During active gameplay, deconstructing and reconstructing a supply point takes several minutes of real time. If your units push too far into enemy territory without a nearby supply depot, their morale and combat effectiveness will plummet.
To manage this effectively:
Monitor the Supply Overview: Access this via the top UI. It shows you exactly where your supply hubs are located.
Proactive Relocation: As your tank spearheads break through enemy lines, delete and move your supply points forward before your units run dry.
Strategic Placement: Keep your supply points close to your armored divisions, as tanks consume supplies at a significantly higher rate than infantry during breakthroughs.
Scouting and Intelligence Operations
Scouting is far more than just revealing the fog of war; it is a fundamental pillar of your offensive capability. A unit that is "marked" by your scouts displays a binocular icon, which directly degrades the enemy's defensive capabilities and morale.
Aerial Recon: Use air scout squadrons to look behind the contact line to identify enemy supply depots.
Artillery Coordination: Scouting significantly improves the accuracy and destructive power of your artillery barrages.
Targeted Breakthroughs: Always scout the path of your intended tank spearhead to ensure you aren't walking into a minefield or a heavily fortified position.
Remember that orders are context-sensitive. If an army formation lacks a scout unit, it will not have the option to perform scouting orders. Always verify your unit composition in the army builder before committing to a mission.
Executing Complex Offensives
Successful offensives in Battleplan require a symphony of different unit types working in tandem. A common mistake is to rely solely on one type of unit. Instead, use a multi-stage approach:
Softening the Front: Use artillery barrages to reduce enemy fortification levels. You can check these levels by zooming in on enemy units or viewing their status boxes.
Pinning the Enemy: Issue 'Counterattack' or 'Seize Ground' orders with your infantry to keep the enemy occupied and pinned in place.
The Breakthrough: Once the enemy is pinned and their fortifications are weakened, launch your armored division using a 'Breakthrough' order.
The Mopping Up: Immediately follow your tanks with infantry to secure the territory and eliminate isolated pockets of resistance.
Phase 1: Identify the breakthrough point and move your supply points to support the advance.
Phase 2: Execute air support and artillery orders to weaken the target area.
Phase 3: Trigger the tank breakthrough.
Phase 4: As the tanks move, immediately begin planning the next phase to ensure the infantry stays close behind.
Army Management and Customization
For players who enjoy deep simulation, the army builder is a powerful tool. You can edit formations, hire and promote officers, and even customize individual unit names and patches.
If you prefer to jump straight into the action, the game provides a "Use Historical Units" option. This bypasses the management phase, allowing you to start the mission with a pre-configured, historically accurate army. However, for long-term campaigns, taking the time to manage your officers—leveling them up and choosing traits—is essential for maintaining the combat effectiveness of your divisions over months of simulated war.
How do I deal with air squadrons running out of supplies?
Ensure you have an active supply point within the range of your airbase or village. If you move your supply point to support an advance, you must use the 'Rebase' option for your aircraft, otherwise, they will become ineffective due to lack of fuel and munitions.
Why are my units not following my orders efficiently?
Check your unit's morale and supply status. If they are low on either, they will not be able to execute orders effectively. Additionally, ensure you are not trying to issue orders that the formation is incapable of performing, such as clearing mines without an engineer unit.